The OpenXML file format used by Microsoft Office 2007 enables programmatic document manipulation without automating Word, so that Word does not need to be installed alongside your code, which is great for server applications. In this post, I’ll show you how to use OpenXML to implement bi-directional data binding between a Word document and XML data. This new feature in Word 2007 delivers the best data/view separation we’ve seen to date in Microsoft Office. And (for a LINQ junkie such as myself, anyway) the best part is that it works so nicely with LINQ to XML.
We’ll begin by creating a document with content controls. Then we’ll write a small amount of code to embed an XML file into the document and bind the content controls to various elements in the XML.
Before starting, you need to download the OpenXML SDK 2.0. Once the SDK is installed, you’ll have the assemblies you need to programmatically manipulate Office documents using the OpenXML API. You can download the SDK from here: http://www.microsoft.com/downloads/details.aspx?FamilyId=C6E744E5-36E9-45F5-8D8C-331DF206E0D0&displaylang=en
Create the Document
We’ll create a simple document with three content controls that will be bound to the following XML data:
<Customer>
  <Name>John Doe</Name>
  <Expiration>2/1/2010</Expiration>
  <AmountDue>$129.50</AmountDue>
</Customer>
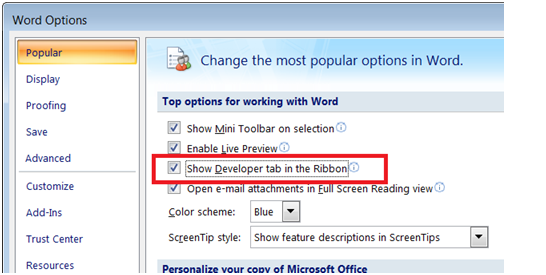
Start a new document in Word 2007, and type the word Dear followed by a space. We now want to inject our first content control for the customer name. You can add content controls to your document from the Developer tab on the ribbon, but since that tab is hidden by default, you’ll need to show it first. Click the Office button and choose Word Options. Then check the “Show Developer tab in the Ribbon” checkbox and click OK.
With the cursor still positioned after the text “Dear “, click in the Developer tab to insert a new Text content control:
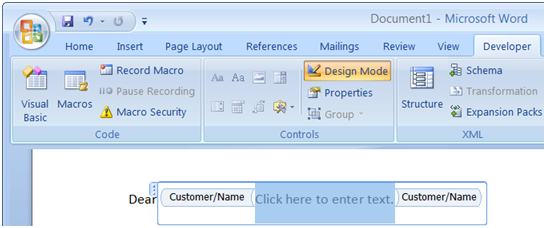
We’ll be assigning tag names to identify content controls for data binding in our code. To view the tag names in Word as we setup the content controls, click the Design Mode button in the Developer tab:
With the content control still selected, click Properties:
Set the Tag of the content control to Customer/Name, which is an XPath expression that refers to the <Name> element nested inside the <Customer> element of our XML data.
Click OK to close the dialog box. Notice how Word displays the tag name in the content control in Design Mode:
Continue adding text to the document, and insert two more content controls in a similar fashion for the expiration date and amount due fields. Use the same Text content control for the amount due field like we used for the customer name field, but use a Date Picker content control for the expiration date field:
After setting the tag names of the additional content controls to the appropriate XPath expressions (Customer/Expiration and Customer/AmountDue), your document should look something like this:
Turn off Design Mode to hide the tag names from the content controls:
Save the document as CustomerReminder.docx. We have already established a separation of variable data and fixed document text, and could easily setup document protection at this point to allow manual data entry only for content controls. That’s cool all by itself, but we’re going to take this to the next level and implement automatic data binding between these content controls and a separate XML file. Although Word doesn’t care what values you assign to content control tags, we will now write code to find all tagged content controls, and treat those tags as XPath expressions that point to various XML elements in our XML data.
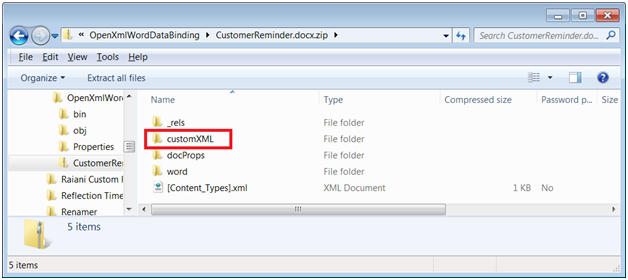
If you’re not already aware, all Office 2007 documents (including Word docx files) are actually compressed zip files (“packages”) that hold a collection of related XML “parts.” You can see this easily by simply appending .zip to the document filename and then opening it from Windows Explorer:
After examining the contents of the document package, rename the filename extension back to “.docx.”
Write the Code
Start Visual Studio and create a new Windows Forms project. Now set references to the two assemblies you’ll need for OpenXML programming: DocumentFormat.OpenXml and WindowsBase (these can be found on the .NET tab of the Add Reference dialog box). The first assembly exposes the OpenXML object model for document manipulation, and the second assembly provides the support for embedding and extracting parts to and from the document package:
Drop a button onto the form named btnInit and supply code for its Click event handler. You’ll also need a few additional using statements for importing some namespaces. The complete code listing below shows the required using statements and the btnInit_Click event handler.
using System;
using System.IO;
using System.Linq;
using System.Windows.Forms;
using System.Xml.Linq;

using DocumentFormat.OpenXml.Packaging;
using DocumentFormat.OpenXml.Wordprocessing;

namespace OpenXmlWordDataBinding
{
  public partial class Form1 : Form
  {
    public Form1()
    {
      InitializeComponent();
    }

    private void btnInit_Click(object sender, EventArgs e)
    {
      var xml =
        new XElement("Customer",
          new XElement("Name", "John Doe"),
          new XElement("Expiration", "2/1/2010"),
          new XElement("AmountDue", "$129.50"));

      var docxFile = @"..\..\CustomerReminder.docx";

      using (var wpd = WordprocessingDocument.Open(docxFile, true))
      {
        var mainPart = wpd.MainDocumentPart;
        var xmlPart = mainPart.AddNewPart<CustomXmlPart>();
        using (Stream partStream = xmlPart.GetStream(FileMode.Create, FileAccess.Write))
        {
          using (StreamWriter outputStream = new StreamWriter(partStream))
          {
            outputStream.Write(xml);
          }
        }

        var taggedContentControls =
          from sdt in mainPart.Document.Descendants<SdtRun>()
          let sdtPr = sdt.GetFirstChild<SdtProperties>()
          let tag = (sdtPr == null ? null : sdtPr.GetFirstChild<Tag>())
          where tag != null
          select new
          {
            SdtProps = sdtPr,
            TagName = tag.GetAttribute("val", "http://schemas.openxmlformats.org/wordprocessingml/2006/main").Value
          };

        foreach (var taggedContentControl in taggedContentControls)
        {
          var binding = new DataBinding();
          binding.XPath = taggedContentControl.TagName;
          taggedContentControl.SdtProps.Append(binding);
        }

        mainPart.Document.Save();
      }
    }
  }
}
Let’s analyze this code piece by piece. First, we construct the XML data as a graph of XML objects using LINQ to XML functional construction:
var xml =
  new XElement("Customer",
    new XElement("Name", "John Doe"),
    new XElement("Expiration", "2/1/2010"),
    new XElement("AmountDue", "$129.50"));
Next, we invoke WordprocessingDocument.Open to open the Word document for write access using the OpenXML SDK. We do this inside of a using block to ensure proper disposal of unmanaged resources in the event that unhandled exception occurs inside of the block. The boolean true value specified for the second parameter means that we’re opening the document for write access:
var docxFile = @"..\..\CustomerReminder.docx";
using (var wpd = WordprocessingDocument.Open(docxFile, true))
Our code needs to do two things to the document at this point: add a new XML part containing the data to be bound, and assign the appropriate bindings to the content controls. Realize that this is code that will only execute once; subsequently, we’ll only be extracting/embedding the XML part from/to the document package using normal zip compression methods.
Add a New XML Part
With the document open and accessible to our code via the wpd variable, we invoke the AddNewPart<CustomXmlPart> method on wpd.MainDocumentPart to retrieve a new XML part in xmlPart. The new XML part exposes a GetStream method that enables us to stream content into and out of it. We take the generic Stream returned by GetStream and wrap a StreamWriter around it. The XML content can then be sent into the new XML part by writing to the StreamWriter. Again, we use nested using blocks on the stream objects to ensure proper cleanup if an exception occurs:
var mainPart = wpd.MainDocumentPart;
var xmlPart = mainPart.AddNewPart<CustomXmlPart>();
using (Stream partStream = xmlPart.GetStream(FileMode.Create, FileAccess.Write))
{
  using (StreamWriter outputStream = new StreamWriter(partStream))
  {
    outputStream.Write(xml);
  }
}
Now that the XML data is embedded as an XML part inside of the document’s .docx package, it’s available for data binding to content controls. The next and last thing we need to do is to programmatically find the tagged content controls inside the document and assign XML data bindings using the XPath expressions we defined in the content control tags.
Add the Data Bindings
Learning how to program Word with OpenXML is all about exploring the special XML markup language used by Word (a dialect known as WordprocessingML) and discovering the element and attribute names used to represent the document. You can view the document’s markup by examining the word/document.xml part inside of the .docx package. It can take quite a bit of detective work as you undergo the exploration and discovery process, but once you’re armed with the information you need, it’s very simple and straightforward to write a LINQ to XML query to get at what you need to in the document.
For example, here is how the customer name content control is expressed in WordprocessingML:
<w:sdt>
     <w:sdtPr>
           <w:tag w:val="Customer/Name"/>
           <w:id w:val="852281"/>
           <w:placeholder>
                <w:docPart w:val="DefaultPlaceholder_22675703"/>
           </w:placeholder>
           <w:showingPlcHdr/>
           <w:text/>
     </w:sdtPr>
     <w:sdtContent>
           <w:r w:rsidRPr="004E1B99">
                <w:rPr>
                      <w:rStyle w:val="PlaceholderText"/>
                </w:rPr>
                <w:t>Click here to enter text.</w:t>
           </w:r>
     </w:sdtContent>
</w:sdt>
An analysis of this XML shows how Word stores content controls inside a document. Specifically, Word creates a <w:sdt> element (structured document tag) and nests a <w:sdtPr> element (structured document tag properties) inside of it. And nested beneath that, Word stores the content control’s tag name in the w:val attribute of a <w:Tag> element. These element names can be referred to programmatically using the OpenXML API type names SdtRun, SdtProperties, and Tag, respectively. Thus, the following LINQ to XML query retrieves all tagged content controls in our document:
var taggedContentControls =
  from sdt in mainPart.Document.Descendants<SdtRun>()
  let sdtPr = sdt.GetFirstChild<SdtProperties>()
  let tag = (sdtPr == null ? null : sdtPr.GetFirstChild<Tag>())
  where tag != null
  select new
  {
     SdtProps = sdtPr,
     TagName = tag.GetAttribute("val", "http://schemas.openxmlformats.org/wordprocessingml/2006/main").Value
  };
In this query, the from clause uses the Descendants<SdtRun> method to retrieve all the <w:sdt> elements in the document. For each one, the first let clause uses the GetFirstChild<SdtProperties> method to retrieve the nested <w:sdtPr> element beneath it. The second let clause then performs a similar operation to retrieve the <w:tag> element nested beneath that. Since you cannot assume that every <w:sdt> element will always have a nested <w:sdtPr> element, the second let clause tests sdtPr for null before trying to invoke GetFirstChild<Tag> on it. The where clause ultimately filters our all content controls that have not been tagged.
The select clause constructs an anonymous type that returns two properties for each tagged content control. The first is the <w:sdtPr> which will be needed to reference the location at which we’ll inject the XML binding element. The second is the tag name extracted from the <w:tag> element’s <w:val> attribute (the full OpenXML namespace needs to be specified for w to retrieve the attribute value), which supplies the XPath expression for the binding. The LINQ query returns the results in a sequence that we then iterate to set the bindings:
foreach (var taggedContentControl in taggedContentControls)
{
  var binding = new DataBinding();
  binding.XPath = taggedContentControl.TagName;
  taggedContentControl.SdtProps.Append(binding);
}

mainPart.Document.Save();
For each tagged content control, we create a DataBinding object, set its XPath property to the tag name which is known provide an XPath expression referencing the desired XML data, and add the binding as a new element inside of the <w:sdtPr> element. Finally, invoking the Save method saves the modified document back to disk. If you examine the WordprocessingML now, you’ll see that our code added a <w:dataBinding> element with a w:xpath attribute to the <w:sdtPr> element in each content control. For example, the customer name content control now has the following element in its <w:sdtPr> section:
<w:dataBinding w:xpath="Customer/Name" />
Now let’s examine the docx package again. Add the .zip extension to the document filename and crack it open. Notice the new customXML folder that wasn’t there before. This is where all custom XML parts added to the document get stored.
Double-click the customXML folder to reveal the item.xml file contained inside of it:
Now double-click item.xml to view it in IE:
Look familiar? That’s the XML our code injected into the document as a custom XML part!
Now close the zip, rename the file back as .docx, and open it in Word:
All the content placeholders have now been filled in with data from our XML file Does it get better than this? You bet! This thing works bi-directional. So go ahead and change John Doe to Sue Taylor:
Now save the document, and rename it as .zip once again. This time, extract the item.xml file instead of opening it in IE, so that you can edit it in Notepad:
Beautiful. Word pushed the data from the modified content controls in the document back out to the XML file. Let’s now edit the XML; for example, we’ll change the expiration date:
Save the XML file, push it back into the zip package, rename the zip package back to .docx, and re-open it in Word one last time:
Now that’s what I call data/view separation! With XML data binding in Word, your application can easily view and change data elements without ever digging into the document text.
Of course, this only scratches the surface of what’s possible with OpenXML. It’s also worth mentioning that the same thing can be achieved using VSTO (Visual Studio Tools for Office) and the Word object model, but we’ll leave that for a future post. Until then, happy coding!


December 9, 2009 at 2:50 pm
Very cool stuff lenni,
One question, I don’t see anywhere in the binding syntax where you specify the name of custom xml document. Is this implied? Does that mean that you can only have one custom xml file per document?
December 12, 2009 at 6:40 am
Since we only added a single part, we didn’t need to specify it in the binding. It’s impled, like you say. But you actually can add any number of custom XML parts to the document, and then refer to specific ones by part ID in your bindings.
January 19, 2010 at 7:01 am
Nice article!
One thing to modify in code, as the latest CTP released in December 2009, This line
32 var xmlPart = mainPart.AddNewPart();
has to be replaced by this line to make the code work
var xmlPart = mainPart.AddCustomXmlPart(CustomXmlPartType.CustomXml);
Source: http://social.msdn.microsoft.com/Forums/en-US/oxmlsdk/thread/95db2ea1-aa48-4b7d-99ae-86b3bad1bdd2
April 3, 2010 at 8:24 pm
Thanks for the update!
January 26, 2010 at 2:56 pm
Does this conflict with the customXML i4i infringement that has forced Microsoft to remove CustomXML from Word. WordProcessingML is seperate to CustomXML but I notice the folder within the package that is named customXML and therefore cannot determine if this is supported in the future.
April 3, 2010 at 8:23 pm
Yes it does, but I haven’t been following it closely enough to provide details.
March 11, 2010 at 4:40 pm
Hi Lenni,
Basically what i want to do is this. Take the data in XML from database and put it in word document. If i use mail merge or bookmarks i have to use COM and i wan to avoid COM.
You mentioned at the end of this article that we can use VSTO to do the same thing. I appreciatiate if you can please provide some inputs on that.
Thanks
V
April 3, 2010 at 8:21 pm
Certainly. With VSTO, it’s the CustomXMLParts property of the document. Add to it to create a new part, then invoke the Load method on the part to consume the XML:
var doc = Globals.ThisAddIn.Application.ActiveDocument;
var newPart = doc.CustomXMLParts.Add(string.Empty, new Microsoft.Office.Core.CustomXMLSchemaCollectionClass());
newPart.Load(@”C:\Demos\Data.xml”);
February 4, 2012 at 11:44 am
Thanks a lot..
This article helped me a lot to understand about MS Word and using it in .net application.
Thanks & Regards
Murali Mahendra Banala