
PowerShell is Microsoft’s modern scripting language for system administration that supports a wide variety of tasks by executing commands (known as cmdlets, pronounced command-lets) from the PowerShell command line. Microsoft has also developed PowerShell cmdlets for managing Microsoft Azure, including a number of useful SQL Database commands. In this post, I’ll show you how to get started using these cmdlets.
Even if you already have PowerShell installed, these special cmdlets for Microsoft Azure need to be installed separately. The following instructions describe how to download and install the cmdlets.
Installing the Microsoft Azure PowerShell cmdlets
To install the Microsoft Azure PowerShell cmdlets, follow these steps:
- Navigate your web browser to https://www.windowsazure.com/en-us/downloads.
- Scroll down to Command-Line Tools, and click the Install link beneath Windows PowerShell.

- When prompted to run or save, click Run.
- If the User Account Control dialog appears, click Yes.
- In the Web Platform Installer dialog, click Install.

- Click I Accept to start the installation.
- When installation completes, click Finish.
- Click Exit to close the Web Platform Installer dialog.


Using the PowerShell Integrated Scripting Environment
Although you can use a simple text editor (even Notepad) to write PowerShell scripts, the PowerShell Integrated Scripting Environment (ISE) is a much more productive environment. As you’ll see, it offers some nice features, such as syntax highlighting and IntelliSense-style auto-completion.
PowerShell can be launched from the command line. To start the PowerShell ISE and view help information for the Azure SQL Database cmdlets, follow these steps:
- Open a command prompt.
- At the command prompt, type powershell_ise.
- At the PowerShell ISE prompt, type get-help get-azuresql, and then pause. In a moment, a popup window appears showing all the cmdlets that start with get-azuresql.

- Double-click on any of the cmdlets to complete the command, and then press Enter to view help for the selected cmdlet.

Configuring PowerShell for your Microsoft account
Before you can start using PowerShell to manage Azure, you need to configure it for your account. This is simply a matter of logging in to the portal, and then running a few PowerShell commands to retrieve your account information from Azure and import it into PowerShell. This section walks you through the process.
To configure PowerShell for your Microsoft account, follow these steps:
- Log in to the Microsoft Azure portal at https://manage.windowsazure.com. This step is necessary for PowerShell to identify your account. If you don’t log in first, you will be prompted to log in when you try to retrieve your account settings in PowerShell.
- Start the PowerShell ISE, as explained in the previous procedure.
- Type Get-AzurePublishSettingsFile to retrieve your account settings. Internet Explorer will open up automatically and download a .publishsettings file with your account information.
- Click Save to save the .publishsettings file to your default Downloads folder.
Important: The .publishsettings file should be kept safe and private, because it effectively provides access to the Azure subscriptions on your Microsoft account. - Back in the PowerShell ISE, type Import-AzurePublishSettingsFile <.publishsettings file>, where <.publishsettings file> is the complete file name (with path) of the account settings file you just saved to your default Downloads folder. (This is typically C:\Users\<username>\Downloads\<subscription-name>.publishsettings.)
The PowerShell ISE doesn’t boast with a message when the settings are imported successfully. You’ll only get an error message if it fails. Otherwise, you’ll know that all went well if you are silently returned back to the PowerShell command-line prompt.
You are now ready to create a server, and then you can create a database on that server.
Creating a new server
First, create a new server and add a firewall rule for your IP address so that the server will allow you to connect to it using PowerShell. To do this, follow these steps in the PowerShell ISE:
- Type New-AzureSqlDatabaseServer –Location “East US” –AdministratorLogin “<new-login>” –AdministratorLoginPassword “<new-password>“, where <new-login> and <new-password> are the credentials you want to assign for the new server. The server is created, and PowerShell responds by displaying the new server name.

- Type New-AzureSqlDatabaseServerFirewallRule –ServerName <server-name> –RuleName <any-name> –StartIpAddress <your-ip-address> –EndIpAddress <your-ip-address>, where <server-name> is the name of the new server created in step 1, <any-name> is an arbitrary name for the new rule (no spaces permitted), and <your-ip-address> is the IP address of your machine. This command creates a new firewall rule to allow PowerShell access to the server from your IP address. If you don’t know your IP address, you can find out what it is by visiting whatismyipaddress.com.


Creating a new database
The New-AzureSqlDatabase cmdlet creates a new database. Before you can use this cmdlet, you must first create an object with your credentials, and then you use those credentials to create a context associated with the server that you want to create the new database on. You store the server context in a variable, and then you specify the server context variable with the New-AzureSqlDatabase cmdlet to create the database (as well as all other cmdlets you might run for that particular server).
To create a new database now, follow these steps in the PowerShell ISE:
- Type $creds = new-object System.Management.Automation.PSCredential(“<login-name>“, (“<login-password>” | ConvertTo-SecureString –asPlainText –Force)), where <login-name> and <login-password> are the administrator login and password you assigned when you created the server in the previous procedure. This stores those administrator credentials in a secure string named $creds.
- Type $context = New-AzureSqlDatabaseServerContext –ServerName <server-name> –Credential $creds, where <server-name> is the name of the server you created in the previous procedure. (The server name is displayed when you create the server) This creates a context associated with the credentials you created in step 1 and the server you created in the previous procedure, and it stores that context in an object named $context.
- Type New-AzureSqlDatabase –Context $context –DatabaseName MyNewDb. This creates a new database named MyNewDb. The database is created on the server associated with $context, using the credentials associated with $creds. When the database is created, PowerShell displays information about the new database.

- It’s often useful to view all the databases that exist on the server. To do so, type Get-AzureSqlDatabase –Context $context. As shown by this cmdlet’s output below, the server includes a master database, just as an on-premises SQL Server does.
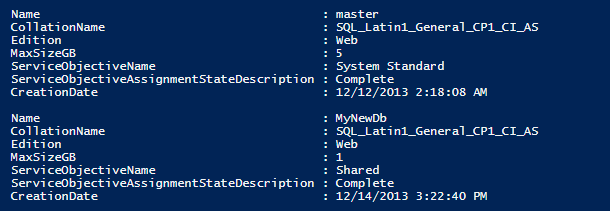


The database you just created with New-AzureSqlDatabase is, by default, a Web edition database with a maximum size of 1 GB and the default collation. This is the same type of database that gets created when you use Quick Create in the Microsoft Azure management portal. To override these defaults, specify the –Edition, –MaxSizeGb, and –Collation switches with an edition, maximum size, and collation of your own choosing. For example, the following statement creates a Business edition database with a maximum size of 150 GB (the largest possible):
New-AzureSqlDatabase –Context $context –DatabaseName MyBigDb -Edition Business -MaxSizeGB 150
You can also change the edition and maximum size (but not the collation) of an existing database by using the Set-AzureSqlDatabase cmdlet with the –Edition and –MaxSizeGb switches. For example, you can use the following command to reconfigure the MyNewDb database you just created as a Business edition database with a maximum size of 20 GB:
Set-AzureSqlDatabase -Context $context -DatabaseName MyNewDb -Edition Business -MaxSizeGB 20
Deleting a database
The Remove-AzureSqlDatabase cmdlet deletes a SQL Database. To delete the MyNewDb database you just created in the previous section, follow these steps:
- Type Remove-AzureSqlDatabase –Context $context –DatabaseName MyNewDb.
- When prompted to confirm, click Yes.
If you are using Remove-AzureSqlDatabase to write scripts you intend to run with no user intervention, you can include the –Force switch. This switch causes the database to be deleted immediately, without being prompted to confirm.
There’s a lot more you can do with these PowerShell cmdlets of course, so be sure to explore all the help topics to learn about all the other supported functionality!

