
Ever since Microsoft integrated the .NET Common Language Runtime (CLR) into the relational database engine back in SQL Server 2005, the recommended technique for extending T-SQL with custom code has been to use SQL CLR with a .NET language (such as C# or VB). This is because CLR code is managed code, meaning that at runtime, the .NET framework ensures that ill-behaved code can never crash the process it’s running in. Prior to SQL CLR, the only way to extend T-SQL was with extended stored procedures written in native C++. Because native code is unmanaged, buggy C++ code can all too easily crash the process it’s running in. In the case of an extended stored procedure, this means crashing SQL Server itself, which I think we can all agree is a bad thing. It is for this very reason that extended stored procedures are deprecated in SQL Server and why SQL CLR is the way to go instead.
That said, you may have an existing C++ dynamic link library (DLL file) which exposes some public function that you need to call from your T-SQL code. Sure, the recommended approach to take is to refactor that C++ code in C# and then call it using SQL CLR. But what if that’s not a viable option? Perhaps you don’t have access to the C++ source code, or perhaps you do and it’s prohibitively expensive to port it to C#. Or maybe you just like living on the edge. In any case, you find that you absolutely need to call into C++, but you don’t want to use extended stored procedures since they are deprecated (and relatively difficult to implement). In this scenario, you can create a C# wrapper function that calls into the C++ DLL, and then implement the C# wrapper function as a SQL CLR user-defined function (UDF). This blog post shows you exactly how to do just that.
First though, to be clear, this technique carries the same risk as extended stored procedures – just one C++ memory access violation resulting from a rogue pointer can instantly crash SQL Server. For this reason, you will see that there are a few additional steps required when implementing such a solution. Fundamentally, these additional steps make it clear that you are introducing risk, and that you absolve SQL Server of any blame if your custom code crashes the SQL Server process as a result.
The next thing to be aware of is 32/64-bit compatibility. That is, you cannot load a 32-bit C++ DLL into a 64-bit SQL Server process, and vice-versa (attempting to do so will surely result in SQL Server throwing a BadImageFormatException error). This presents no problem if you have access to the source code, since you can compile it as either a 32-bit or 64-bit DLL to match the version of SQL Server that you’re running. If you don’t have access to the source code, and the DLL that you have does not match your version of SQL Server, then that presents a greater challenge, although there are several advanced “run out-of-process” solutions that are beyond the scope of this blog post.
The following sections provide step-by-step procedures that walk you through the process of calling C++ from C# in a SQL CLR user-defined function.
- Create the C++ library.
- Test the C++ library (optional).
- Call from a C++ native executable harness.
- Call from a C# executable harness.
- Create the C# SQL CLR UDF.
- Deploy to SQL Server.
For simplicity’s sake, the C++ library code that we’ll be calling from SQL Server is a simple math function named AddIntegers. This function accepts two integer parameters and returns their sum. I’ll demonstrate using Visual Studio 2013, although everything works just the same with earlier Visual Studio versions (I can confirm this for certain with VS 2012 and VS 2010, but it most likely works with even older VS versions as well).
Creating the C++ library
The instructions assume that you’re running 64-bit SQL Server, and thus they also explain how to compile the native C++ code as a 64-bit DLL.
To create the C++ library, follow these steps:
- Start Visual Studio 2013 (note that these instructions also work with VS 2010 and 2012).
- Create the new C++ library project:
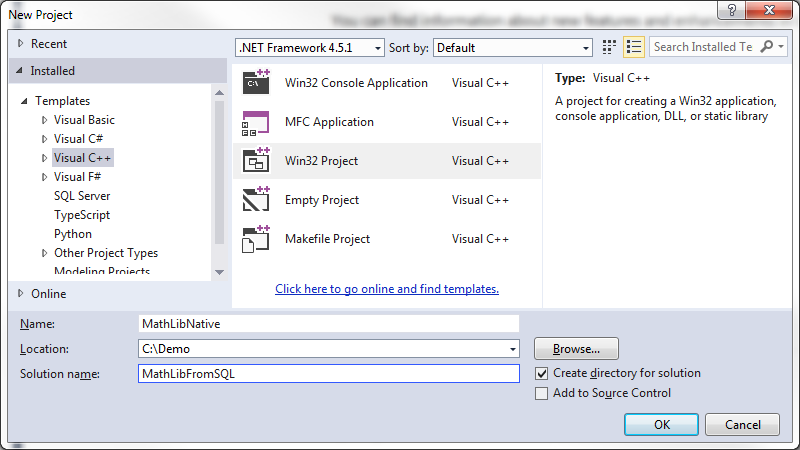
- From the File menu, choose New Project.
- Under Installed Templates, choose Visual C++
- Select the Win32 Project template.
- Name the project MathLibNative.
- Choose any desired location to create the project; for example, C:\Demo\.
- Name the solution MathLibFromSQL.

- Click OK
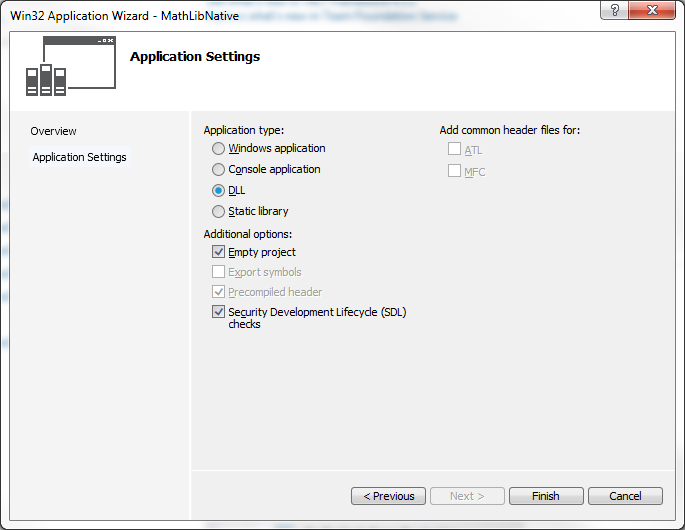
- When the Win32 Application Wizard appears:
- Click Next.
- For Application Type, choose DLL.
- For Additional Options, check Empty Project.
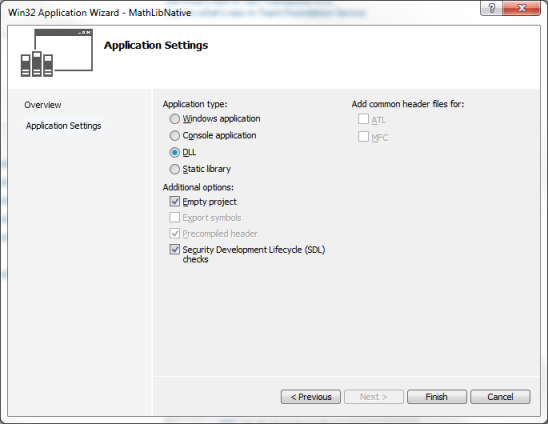
- Click Finish.
- Create the header file. This will contain the publically visible signature to the AddIntegers function.
- Right-click the MathLibNative project in Solution Explorer and choose Add | New Item.
- In the Add New Item dialog, choose Header File (.h).
- Name the file MathFunctions.h.
- Click Add.
- Type the following in the code editor for MathFunctions.h:
__declspec(dllexport) int AddIntegers(int a, int b);
- Implement the AddIntegers function.
- Right-click the MathLibNative project in Solution Explorer and choose Add | New Item.
- In the Add New Item dialog, choose C++ File (.cpp).
- Name the file MathFunctions.cpp.
- Click Add.
- Type the following in the code editor for MathFunctions.cpp.
#include "MathFunctions.h"

int AddIntegers(int a, int b)
{
  int sum = a + b;
  return sum;
}
- Configure the library project for 64-bit, which is required since we intend to load this DLL into 64-bit SQL Server.
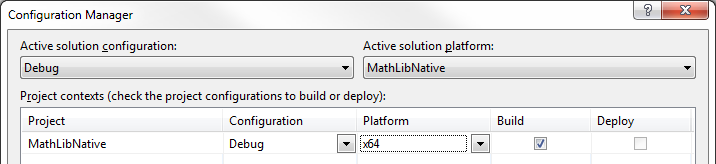
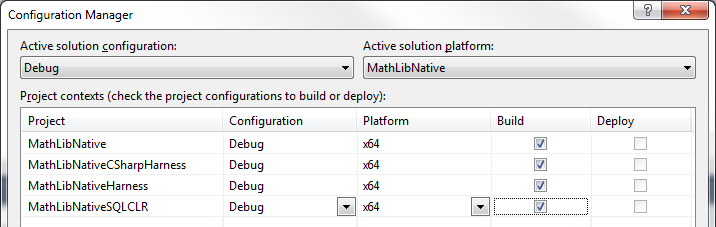
- From the BUILD menu, choose Configuration Manager.
- Click the Active Solution Platform dropdown and choose <New…> to display the New Solution Platform dialog.
- In the Type Or Select The New Platform combobox, type MathLibNative.
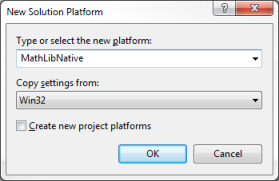
- Click OK to close the New Solution Platform dialog.
- Click the Platform dropdown for the MathLibNative project (it is currently set for Win32, meaning 32-bit).
- Click <New…> to display the New Project Platform dialog.
- Choose x64 from the New Platform dropdown.
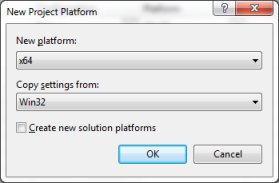
- Click OK to close the New Project Platform dialog.

- Click Close to close the Configuration Manager dialog.
- Press CTRL+SHIFT+B to build the solution and ensure there are no compiler errors. This creates the native DLL file named MathLibNative.dll. The __declspec(dllexport) attribute in the header file (in step 4e above) also causes the compiler to generate a library file named MathLibNative.lib that you can link to from another C++ application (you will do this in the next section when you create an executable C++ test harness).


Testing the C++ library (optional)
Ultimately, we’re going to call into the native DLL file directly from a SQL CLR UDF written in C#. However, it’s often helpful to create a test harness first. This aids in debugging and helps prove that the DLL works as expected. In this section, we’ll create two test harness applications, one native C++ executable and one C# executable. The C++ executable will allow you to single-step debug into the C++ DLL, and the C# executable will help you determine the correct interface for calling into the C++ DLL. Again, this isn’t strictly necessary; you can instead jump ahead to the next section and create the SQL CLR UDF. However, the moment something doesn’t work as expected (and that moment will come), you’ll need to fall back on one or both of these test harnesses to help discover what the problem is, so it’s good to have them.
Creating a native C++ executable test harness
To create the native C++ executable test harness, follow these steps:
- Create a new C++ executable project:
- Right-click the MathLibFromSql solution in Solution Explorer and choose Add | New Project.
- Under Installed Templates, choose Visual C++
- Select the Win32 Project template.
- Name the project MathLibNativeHarness.
- Leave the default for the project location.
- Click OK.
- When the Win32 Application Wizard appears:
- Click Next.
- For Application Type, choose Console Application.
- For Additional Options, check Empty Project.
- Click Finish.
- Create the harness code. This is placed in a function named main, which is the entry point for the console executable:
- Right-click the MathLibNativeHarness project in Solution Explorer and choose Add | New Item.
- In the Add New Item dialog, choose C++ File (.cpp).
- Name the file Main.cpp.
- Click Add.
- Type the following in the code editor for MathFunctions.cpp.
#include "..\MathLibNative\MathFunctions.h"
#include <iostream>

int main()
{
  int sum = AddIntegers(23, 9);
  std::cout << sum << std::endl;
}
- Configure the harness project for 64-bit.
- From the BUILD menu, choose Configuration Manager.
- Click the Active Solution Platform dropdown choose MathLibNative.
- Click the Platform dropdown for the MathLibNativeHarness project.
- Click <New…> to display the New Project Platform dialog.
- Choose x64 from the New Platform dropdown.
- Click OK to close the New Project Platform dialog.
- Check the Build checkbox for the MathLibNativeHarness project.

- Click Close to close the Configuration Manager dialog.
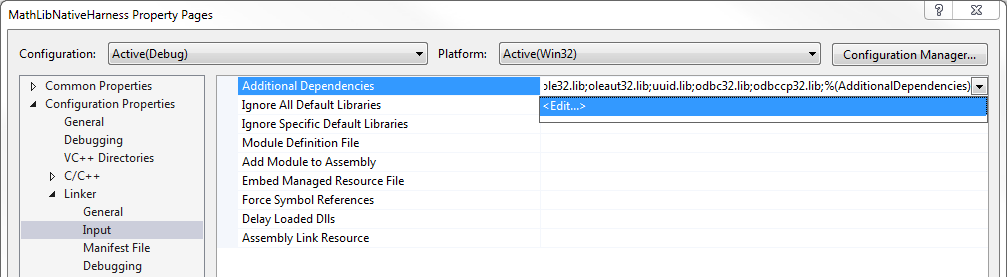
- Link to the library.
- Right-click the MathLibNativeHarness project in Solution Explorer and choose Properties.
- Expand the Linker options and click Input.
- For Additional Dependencies, click the dropdown and choose <Edit…>

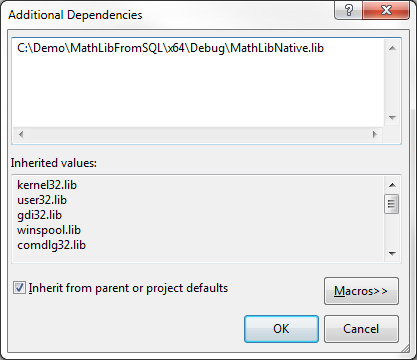
- In the Additional Dependencies dialog, type the full path to the MathLibNative.lib file generated by the compiler when it built the DLL file. If you created the solution in C:\Demo, the full path is C:\Demo\MathLibFromSQL\x64\Debug\MathLibNative.lib.

- Click OK to close the Additional Dependencies dialog.
- Click OK to close the project’s property pages dialog.
- Press CTRL+SHIFT+B to build the solution and ensure there are no compiler errors.
- Run the C++ test harness.
- Right-click the MathLibNativeHarness project in Solution Explorer and choose Set As Startup Project.
- Press CTRL+F5 to run the harness without the debugger.
- The console output should appear with the expected result (32, which is 23 plus 9), proving that the DLL is being called properly.


If you wish, you can also run the harness with the debugger by pressing F5. This will display and close the console window too quickly for you to see the output, but you can set breakpoints and debug the code. You can even single-step into the DLL file itself.
Creating a C# executable test harness
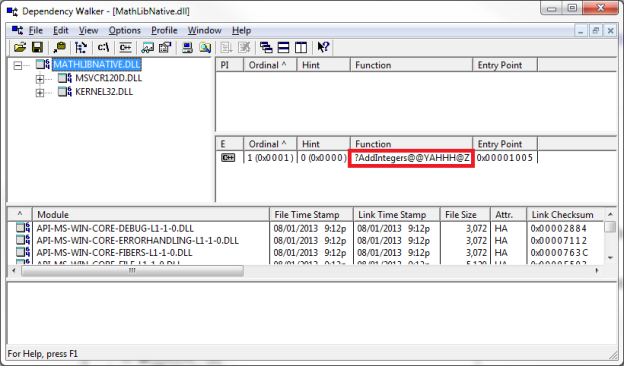
Calling the native C++ DLL from C# works differently, and since that’s what we need to do in our SQL CLR UDF with a C# class library, it’s also helpful to figure out how to “get it right” first with a C# console application test harness. One critical part in getting this to work is to identify the correct entry point to the AddIntegers function. This would be easy if the entry point was simply named after the function (i.e., AddIntegers), but unfortunately that’s not the case. The entry point is based on the function name, but is preceded by a question mark symbol and suffixed with a bit of randomly generated text. Fortunately, there is a small, simple, and free tool available on the web named Dependency Walker that can discover the entry point for you.
Before creating the C# executable test harness, use Dependency Walker to discover the entry point to the AddIntegers function. To do so, follow these steps:
- Download Dependency Walker from http://www.dependencywalker.com.
- Extract the downloaded zip file to a folder of your choice.
- Navigate to the folder and launch depends.exe.
- In the Security Warning dialog, click Run.
- From the File menu, choose Open.
- Navigate to the folder where the native C++ DLL file was built (i.e., C:\Demo\MathLibFromSQL\x64\Debug).
- Double-click the file MathLibNative.dll.
- Dependency Walker may display a message that errors were detected, but this can be safely ignored; just click OK.
- Locate the entry point to the AddIntegers function in the second grid on the right.
- Leave this window open so you can easily copy the entry point name and paste it into the C# code in the next procedure.

To create the C# executable test harness, follow these steps:
- Create a new C# executable project:
- Right-click the MathLibFromSql solution in Solution Explorer and choose Add | New Project.
- Under Installed Templates, choose Visual C#
- Select the Console Application template.
- Name the project MathLibNativeCSharpHarness.
- Leave the default for the project location.
- Click OK.
- Replace the starter code generated by Visual Studio in Program.cs with the following:
using System; using System.Runtime.InteropServices; namespace MathLibNativeCSharpHarness { class Program { [DllImport(@"C:\Demo\MathLibFromSQL\x64\Debug\MathLibNative.dll", CallingConvention = CallingConvention.Cdecl, EntryPoint = "?AddIntegers@@YAHHH@Z")] private static extern int AddIntegers(int a, int b); static void Main(string[] args) { int sum = AddIntegers(33, 19); Console.WriteLine(sum); } } } - Note the EntryPoint parameter of the DllImport attribute. This is the value that I pasted in from Dependency Walker as I wrote this post. To use the appropriate EntryPoint parameter value for your environment:
- Return to the Dependency Walker window that you opened to MathLibNative.dll in the previous section.
- Right-click the Function value in the second grid on the right and choose Copy Function Name.
- Return to the C# code and paste it in as the EntryPoint parameter value in the DllImport attribute.
- Also note the pathname to MathLibNative.dll; adjust it as necessary if you have created the solution in a folder other than C:\Demo.
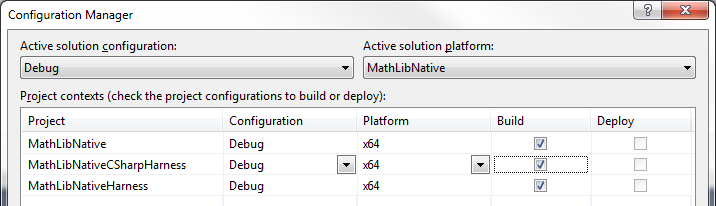
- Configure the harness project for 64-bit.
- From the BUILD menu, choose Configuration Manager.
- Click the Platform dropdown for the MathLibNativeCSharpHarness project.
- Click <New…> to display the New Project Platform dialog.
- Choose x64 from the New Platform dropdown (it may already be selected by default).
- Click OK to close the New Project Platform dialog.
- Check the Build checkbox for the MathLibNativeCSharpHarness project.

- Click Close to close the Configuration Manager dialog.
- Press CTRL+SHIFT+B to build the solution and ensure there are no compiler errors.
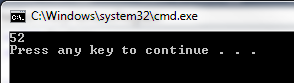
- Run the C# test harness.
- Right-click the MathLibNativeCSharpHarness project in Solution Explorer and choose Set As Startup Project.
- Press CTRL+F5 to run the harness without the debugger.
- The console output should appear with the expected result (52, which is 33 plus 19), proving that the DLL is being called properly and that we have figured out the correct DllImport attribute to use in the C# code that we’ll create for the SQL CLR UDF.

Creating the C# SQL CLR UDF
You’re now ready to write the SQL CLR UDF, which is a C# method decorated with the SqlFunction attribute. This is a simple wrapper method; all it does is call into the C++ DLL just like the C# executable harness we created in the previous procedure does. The wrapper method itself accepts and returns special data types that correspond to SQL Server. In our scenario, the method accepts two SqlInt32 parameters and returns a SqlInt32 value, where SqlInt32 corresponds to the int data type in C++ and C#.
To create the C# SQL CLR UDF, follow these steps:
- Create a new C# class library project.
- Right-click the MathLibFromSql solution in Solution Explorer and choose Add | New Project.
- Under Installed Templates, choose Visual C#
- Select the Class Library template.
- Name the project MathLibNativeSQLCLR.
- Leave the default for the project location.
- Click OK.
- Delete the Class1.cs file (this file was generated automatically for the project by Visual Studio and is not needed).
- Right-click the Class1.cs file in Solution Explorer and choose Delete.
- Click OK to confirm that you want to delete the file Class1.cs.
- Add the MathFunctions class.
- Right-click the MathLibNativeSQLCLR project in Solution and choose Add | New Item.
- In the Add New Item dialog, choose Class.
- Name the file MathFunctions.cs.
- Click Add.
- Replace the starter code generated by Visual Studio in MathFunctions.cs with the following:
using System.Data.SqlTypes;
using System.Runtime.InteropServices;

namespace MathLibNativeSQLCLR
{
  public class MathFunctions
  {
    [DllImport(@"C:\Demo\MathLibFromSQL\x64\Debug\MathLibNative.dll",
      CallingConvention = CallingConvention.Cdecl,
      EntryPoint = "?AddIntegers@@YAHHH@Z")]
    private static extern int AddIntegers(int a, int b);

    public static SqlInt32 AddIntegersUdf(SqlInt32 a, SqlInt32 b)
    {
      var sum = AddIntegers((int)a, (int)b);
      return sum;
    }
  }
}
- Note the EntryPoint parameter of the DllImport attribute. This is the same value we used for the C# harness in the previous procedure. If you skipped the previous procedure as optional, you need to at least follow the instructions found there for using Dependency Walker to discover the correct entry point name.
- Also note the pathname to MathLibNative.dll; adjust it as necessary if you have created the solution in a folder other than C:\Demo.
- Configure the SQL CLR project for 64-bit.
- From the BUILD menu, choose Configuration Manager.
- Click the Platform dropdown for the MathLibNativeSQLCLR project.
- Click <New…> to display the New Project Platform dialog.
- Choose x64 from the New Platform dropdown (it may already be selected by default).
- Click OK to close the New Project Platform dialog.
- Check the Build checkbox for the MathLibNativeSQLCLR project.
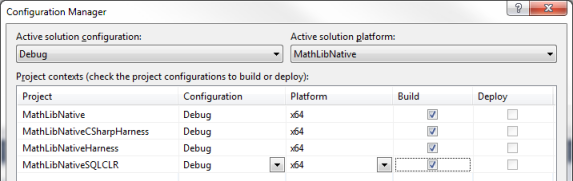
- Click Close to close the Configuration Manager dialog.
- Press CTRL+SHIFT+B to build the solution and ensure there are no compiler errors.
Deploying to SQL Server
You’re now ready to deploy the SQL CLR UDF you created in the previous procedure to a SQL Server database. To do this, use your tool of choice to connect to your SQL Server instance and open a new query window that you can execute T-SQL commands in. You can of course use SQL Server Management Studio (SSMS), or alternatively, you can use SQL Server Data Tools (SSDT) inside of Visual Studio (SSDT is installed by default with VS 2012 and VS 2013, but needs to be installed separately for VS 2010).
Most of the remaining steps are standard procedure with any SQL CLR implementation. However, some of them are required specifically because we’re calling native C++ code from SQL CLR.
- Enable SQL CLR. This, of course, is required to support any custom SQL CLR implementation in SQL Server.
EXEC sp_configure 'clr enabled', 1
RECONFIGURE
GO
- Create the database.
CREATE DATABASE MathLibDb
GO
USE MathLibDb
GO
- Set the database’s TRUSTWORTHY property. This is normally not required for SQL CLR, but is needed here so that “unsafe” assemblies (that is, those that call into native C++ code) can be created in the database.
ALTER DATABASE MathLibDb SET TRUSTWORTHY ON
GO
- Create the assembly. Because this assembly calls into native C++ code, you must also specify PERMISSION_SET = UNSAFE.
CREATE ASSEMBLY [MathLibNativeSQLCLR]
  AUTHORIZATION dbo
  FROM 'C:\Demo\MathLibFromSQL\MathLibNativeSQLCLR\bin\x64\Debug\MathLibNativeSQLCLR.dll'
  WITH PERMISSION_SET = UNSAFE
GO
- Create the T-SQL UDF.
CREATE FUNCTION AddIntegersUdf(@A int, @B int)
  RETURNS int
  AS EXTERNAL NAME [MathLibNativeSQLCLR].[MathLibNativeSQLCLR.MathFunctions].[AddIntegersUdf]
GO
After all this effort, it’s quite rewarding to see the result. To watch the magic happen, invoke the T-SQL UDF just like you would any other, passing in any two numbers to be added. For example:
SELECT dbo.AddIntegersUdf(47, 16)
When you see the query return the sum of the two numbers passed in to the UDF, you know that everything is working correctly:
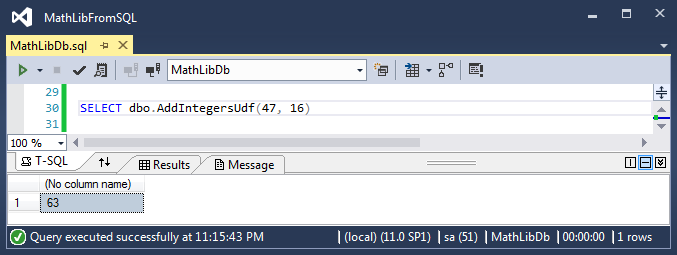
The T-SQL code calls the SQL CLR UDF, which calls the native C++ DLL that performs the work and returns the result all the way back up to SQL Server. So yes, it takes some effort, but it does work. Remember though, make sure your C++ code is well-behaved or you risk crashing SQL Server!


Leave a comment